The Battle of Hamel : The Use of Modern Means
Tanks
Artillery
Planes


1. The tanks
The commander of the Tank Corps, Brigadier-General Hugh Hells had recently received the brand new Mark V tanks. He recommended that they be used in battle as quickly as possible, before the Germans could produce their own tanks in large numbers.  The British Tank Corps also wanted to restore the Australian’s trust. This trust had been lost at Bullecourt on 11 April 1917 during a combined operation, where the tanks had let the Australians down badly due to mechanical problems and confusion with map reading, resulting in the loss of many lives.  So, the Australians chiefs Monash and Blamey were invited to see the Mark V in action. This new pattern of assault tank had benefited from many improvements. As an example, only one man was required to drive it and its engine has been especially designed. The tank commander also had a better visibility. Concerning weapons, the Lewis-guns that were on Mark IV tanks had been replaced by heavy Hotchkiss machine-guns set with a better angle of fire. 

Peronne, 27 March 1919. A Mark V (male) Battle Tank, a remnant on the battlefield. AWM E04445©
By watching the new tanks, Monash and Rawlinson were convinced that this new weapon could reduce the losses and increase the chance for the attack on Le Hamel. So they asked for the involvement of tanks. Monash got sixty tanks in five companies under General A. Courage command (Tank Corps, 5th Brigade).  In his opinion, tanks would precede the infantry and would take the place of the artillery barrage which normally suppressed the fire of the German machine guns. It was not the point of view of the Australian infantry officers. They knew from experience that the troops could advance safely under the close protection of the artillery barrage but that it was a great risk to rely on the tanks. So, Monash insisted in that the tanks would follow the first infantry wave and obey the orders of the infantry officers on the ground – calling them forward when there was sufficient light to deal with any stubborn German strong points that survived the Artillery barrage. 

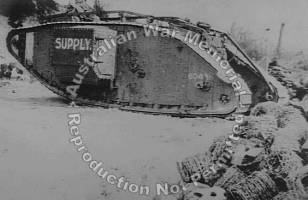
Villers-Bretonneux. August 1918. Supply tank en route to the lines. Note the rolls of barbed wire in the right foreground. AWM C04889©
In addition to the assault tanks, they were four carrier tanks to supply the advancing troops. Each of those tanks could quarry 134 barbwire coils, 450 piquets, 45 irons sheets, 50 waters cans, 150 mortars bombs, 10.000 rounds and 20 grenades boxes. Entirely, these four carriers would do the job of almost 1.200 men and in less time with little risk of casualties.
To restore the lost trust, the tanks were shown to the Australians of every rank on the 29th of June. Each battalion sent about one tenth of their men to accustom them to working with the new tanks and their crews. Then, the soldiers trained hurriedly with the tanks in Vaux-en-Amiénois, northwest of Amiens. Each of the companies received one tank. The diggers put their colours on it and gave it a name. 

2. The use of the artillery

Monash has been an artillery officer before the war and knew the importance of the firepower. Major General W.A. Coxen, the Australian artillery commander, was in charge of the bombardment. The heavy artillery and the field artillery of the four divisions were mobilized. A large number of British and French guns were also put at the Australians disposal. On the whole, 600 canons would be used. Around 200 heavy and medium guns bombed the known German artillery positions in order to decrease the risk of a counter-barrage. The 400 others were used in the creeping barrage, a fire screen behind which the assailants would advance. Several planes were given the task to attack the enemy guns out of range of the artillery. 
The artillery barrage and its advance (lines) AWME3843©
The artillery preparation also included a matter of deceit for the enemy. Actually, the bombing of the enemy artillery and Hamel sector was diluted in a larger scale. In the same way, the enemy positions were bombed since eight days on the same place and at the same hours. So, the Germans were there used to be bombed without a following attack. The 4th of July, the attack was covered by a barrage of explosive and shrapnel shells but also by gas or smoke shells especially on Vaire and Hamel woods

The creeping barrage advanced by stages according a precise timing. The fire screen kept advancing to the east every two minutes following twenty or so linear landmarks. The assailants progressed in short rushes about 75 yards behind the barrage. One or two times, the artillery fired too short. This way, two sections of the 43rd battalion (one Australian and one American) were struck while they waited in the crops. Almost all of their men were killed or wounded. 


3. The role of planes

A British aircraft (RERe 8) which was shot down at Hamel Wood, by the enemy, after it had succeeded in dropping ammunition to the forward troops by means of parachutes, one of which can be seen caught in the tree tops in the background. The picture was taken the day after the Battle. AWM E03844©
The role of aviation was not only to bomb enemy installations out of reach. Planes were also use as aerial support during every phase of the battle. The involved squadrons belonged to the Australian Flying Corps or to British reinforcements. Aeroplanes were also used to drown out the sounds of the approaching tanks by flying at low altitude. The weeks before, the reconnaissance aircraft had achieved a major locating task. The aerial photographs they took were very useful both for briefing the attacking troops and for identifying targets. During the actual fight, the planes were a great communication means.  Soldiers and pilots got in touch by horns, flares or other signals. All of it allowed the commanders to follow the progression and to inform quickly the various staffs of it, so that, for example, adjustments could be made to the artillery barrage. 

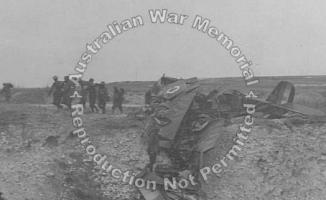
Stretcher bearers of the 11th Australian Infantry Brigade bringing back a wounded man, past R.E.8 Serial B5073, which was shot down near Hamel, during the battle on 4 July. Note individual aircraft letter `C' on the centre section.  AWM E04888©
The battle of Hamel was also the occasion of an unprecedented innovation. For the first time in the history of war and of aviation, ammunitions were dropped by parachute to troops in the new front line. It was an idea of Captain L.J. Wackett from the 3rd AFC Squadron.  Ammunition boxes containing 1,200 rounds were dropped at an altitude of 1,000 feet.

A British aircraft about to crash during the battle. AWME03912©
Each supply aircraft made four rotations and about 90 boxes were dropped. In the same way as the use of supply tanks, this fantastic innovation saved the infantry soldiers from difficult and dangerous tasks. Two planes crashed during the battle. In one of these crashes, two aviators died. A parachute canvas was caught in the wings.

Why such a battle in Hamel ? The Attack of 4th July 1918